Multitech conduit AP MTCAP
Supported models
As of February 2018, this version targets all products listed at the official Multitech Conduit AP website.
Download
| Frequency plan | Download Link |
|---|---|
| EU 863-870 | Download |
| US 902-928 | Download |
| AS 923 | Download |
| AU 915-928 | Download |
Notes
The gateway is not internet ready by default. And unlike its conduit brothers, it comes with no usb port or serial access interface. This guide will help you connect your gateway to your LAN and to the internet. Once you have internet access on your gateway, you can download the right Basestation Client from the gateway itself.
The default IP address of your gateway is 192.168.2.1. Configure your PC to get a static IP address within the following range: 192.168.2.2 - 192.168.2.254. Connect now via SSH to your gateway. If you're on windows the fastest way is probably using Putty. Connect to 192.168.2.1, port 22.
Default credentials, when prompted, are:
For mLinux 3.x and lower - username: root password: root
For mLinux 4.0.0 and above - username: mtadm password: root
For AEP models - username: admin password: admin
Now that you're connected via SSH, we're going to manually edit the network configuration of your gateway.
AEP model
If you have a newer version with the MultiTech AEP panel, access your gateway AEP panel to configure the network for your gateway. If you're running an older version, you'll have to manually configure your network.
[MANUAL configuration]Static IP address
Skip this part if you want to connect to a DHCP client.
If you want to assign a static IP to your gateway change the address and netmask fields.
nano /var/config/network/interfaces
Replace the following:
auto eth0
iface eth0 inet static
address 192.168.2.1
netmask 255.255.255.0
With:
auto eth0
iface eth0 inet static
address [new_ip]
netmask [network_mask]
gateway [network_router]
Press CTRL+X to save. Now do the same with the following file:
nano /etc/network/interfaces
Make sure it's identical to the previous one. Press CTRL+X, save and reboot. Please note your SSH connection will be lost.
reboot
After the gateway has rebooted, you can now open an SSH connection to the IP you enetered in the configuration file.
[MANUAL configuration]DHCP
Skip this part if you have already setup a static IP address for your gateway.
If you have a DHCP server over your network you can configure your gateway to obtain an IP address automatically. First backup your network configuration file:
mv /etc/network/interfaces /etc/network/interfaces.back
Then create a new empty configuration file:
nano /var/config/network/interfaces
Make it look as the following:
# /etc/network/interfaces -- configuration file for ifup(8), ifdown(8)

# The loopback interface
auto lo
iface lo inet loopback

# Wired interface
auto eth0
iface eth0 inet dhcp
Press CTRL+X to save. Now do the same with the following file:
nano /etc/network/interfaces
Make sure it's identical to the previous one. Press CTRL+X, save and reboot. Please note your SSH connection will be lost.
reboot
After the gateway has rebooted, you have to find out what IP address has been assigned to your gateway. You can go over your router page and see the new device IP or, if you're on windows, you can try to use a third party software to find a new IP owned by Multitech Systems on your network.
You can now open an SSH connection to your newly assigned IP.
If you're running a AEP conduit version
- Navigate to the AEP Web Interface and select Setup->LoRa Network Server. Make sure the Enabled checkbox isn't checked under Lora Configuration.
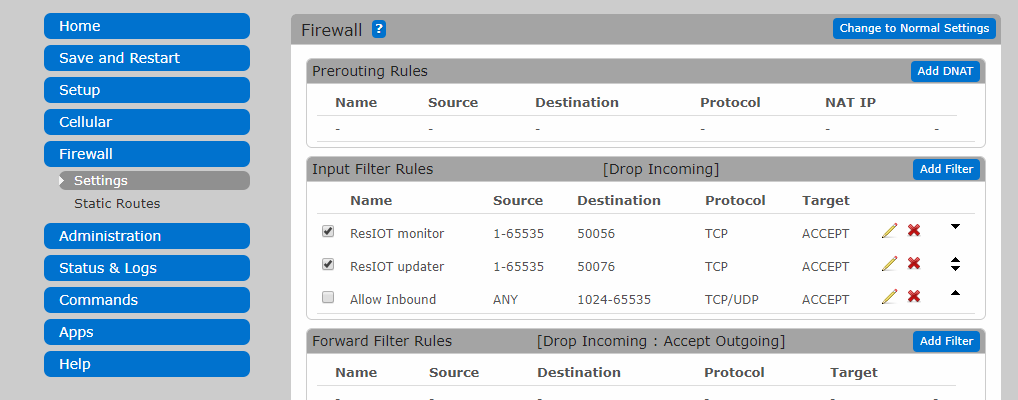
- Navigate to the AEP Web Interface and select Firewall->Settings. Under Input Filter Rules make sure ports TCP destination ports 50056 and 50076 are open by enabling "Allow Inbound" or by adding two single exceptions. See picture.
Installation
We now assume your gateway has access to the cloud. Create now a symbolic link from the zone info file for your location to /etc/localtime:
ln -fs /usr/share/zoneinfo/Europe/Rome /etc/localtime
Update the date and time to the current time:
date "2016-12-11 14:58:01"
Update the hardware clock:
hwclock -u -w
You can now download the Basestation client(the provided link below is the EU version, make sure to change it if you plan to install the american version):
wget https://update.resiot.io/bsclient/resiot-basestation-client-mtechap-EU_863_870.tar.gz
tar -xzvf *.tar.gz
chmod +x installer.sh
./installer.sh
Update
If you want to manually upgrade to the latest version, be sure to be connected to the internet, delete any previous downloaded version file and run the following, making sure you download the correct national version for your gateway:
cd /home/root/
wget https://update.resiot.io/bsclient/resiot-basestation-client-mtechap-EU_863_870.tar.gz
tar -xzvf *.tar.gz
chmod +x ./update.sh
./update.sh
Removal
Shall you want to uninstall the Client, just run the following command:
opkg remove resiot-basestation-client
Running
Your ResIOT™ BaseStation Gateway Client is now installed. Refer to the official ResIOT website for instructions.