Multitech conduit 210/220 series
Supported models
As of February 2018, this version targets all 210 and 220 products listed at the official Multitech Conduit website.
Download
| Frequency plan | Download Link |
|---|---|
| EU 863-870 | Download |
| US 902-928 | Download |
Notes
The gateway is not internet ready by default. Our installer will help set up a internet connection and only once you're connected to a network the Client will be installed. You're going to need a FAT or FAT32 formatted USB flash drive.
Default credentials, when prompted, are:
For mLinux 3.x and lower - username: root password: root
For mLinux 4.0.0 and above - username: mtadm password: root
For AEP models - username: admin password: admin
MultiTech and sudo
If you're running mLinux 4.0.0 or above, the sudo command has been implemented and needs to be prepended for every operation.
If you're running a AEP conduit version
- Navigate to the AEP Web Interface and select Setup->LoRa Network Server. Make sure the Enabled checkbox isn't checked under Lora Configuration.
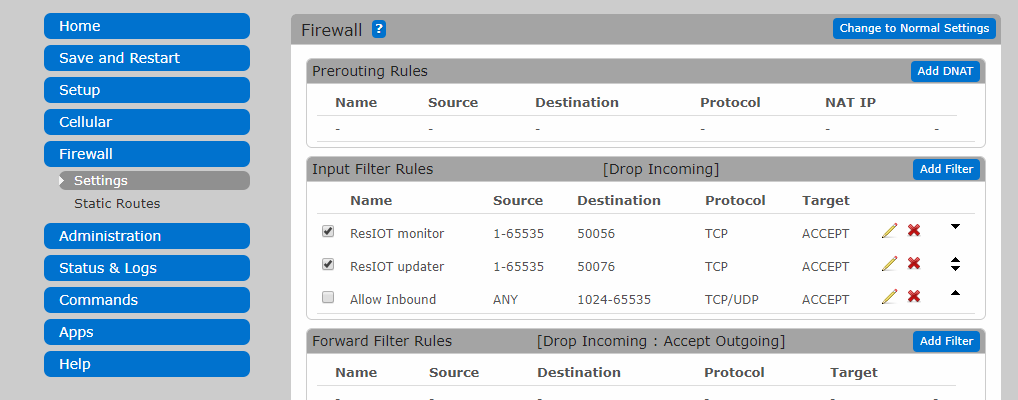
- Navigate to the AEP Web Interface and select Firewall->Settings. Under Input Filter Rules make sure ports TCP destination ports 50056 and 50076 are open by enabling "Allow Inbound" or by adding two single exceptions. See picture.
Installation
Download the right version for your gateway and copy the archive to FAT or FAT32 formatted USB flash drive.
Make sure your mCard is insert in your conduit. Remove the front panel with the Multitech logo from the front of your gateway and connect to a computer with the included cable.
You'll now want to open a serial connection to your gateway. The fastest way via windows is probably using Putty. Select "Serial" as connection mode, 115200 speed and the right COM serial port.
Now plug your USB key into your conduit and mount the system:
mount /dev/sdb1 /mnt
Depending on your model sometimes you'll run into an error. If you do, run instead:
mount /dev/sda1 /mnt
Then copy the installer to the root of the Conduit:
cp -r /mnt/* /home/root/
Now you can safely unmount the USB drive:
umount /mnt
The archive is now on your gateway. Head to your Home directory, and extract your archive.
cd /home/root/
tar -xzvf *.tar.gz
chmod +x ./installer.sh
./installer.sh
Follow the instructions and setup your network configuration. Unplug the power cable when asked and then plug it back in. Once the prompt responds to your commands again, rerun the installer.
./installer.sh
The script will now install and run the client. A reboot might be needed for things to work correctly:
reboot
The client is now installed and running correctly on your gateway.
Update
If you want to manually upgrade to the latest version, be sure to be connected to the internet, delete any previous downloaded version file and run the following, making sure you download the correct regional version for your gateway:
cd /home/root/
wget https://update.resiot.io/bsclient/resiot-basestation-client-mtechftdi-EU_863_870.tar.gz
tar -xzvf *.tar.gz
chmod +x ./update.sh
./update.sh
Updating
If you're updating a really old version (v9 or less) you're probably going to lose your settings and you will need to reconfigure your client. This won't happen on v9 or later distributions.
Removal
Shall you want to uninstall the Client, just run the following command:
opkg remove resiot-basestation-client
Running
Your ResIOT™ BaseStation Gateway Client is now installed. Refer to the official ResIOT website for instructions.