How to create full application for "Smart Parking For People With Disabilities"
![]()
Install app/download source code


What is it
ResIOT Smart Parking For People With Disabilities is a project for the creation of intelligent parking lots.
This project aims to simplify the management and control of car parks through the use of our ResIOT platform.
Project's Components
-
Software
1) ResIOT Cloud or OnPremise:
Compatible with ResIOT Cloud and OnPremise with software version 2.0.0 or older.
For this project 4 different APIs will be used:
- "/api/user/gettoken/api/{Username}/{Password}": Get the unique token that serves as authentication for subsequent API calls;
- "/api/scene/runwithcallback": Call and start a scene created specifically for this project and then return the required values in response;
- "/api/application/{appEUI}/nodes/{devEUI}/tag/{name}": Call used to request the value of a tag of a node in order to understand, in this case, the current status of a parking lot;
- "/api/application/{appEUI}/nodes/{devEUI}/tag/{name}/value": Call used to set a tag of a node and in this case is used to set the occupation of a parking lot;2) 3 x Script Lua 5.1 Scenes:
Specifically 2 "Advanced Scene Lua 5.1" and 1 "Smart Scene" which will be explained in detail in a subsequent paragraph;
3) ResIOT App "ResIOT Smart Parking":
Available on Android, Ios Store or with direct source code download. -
Hardware
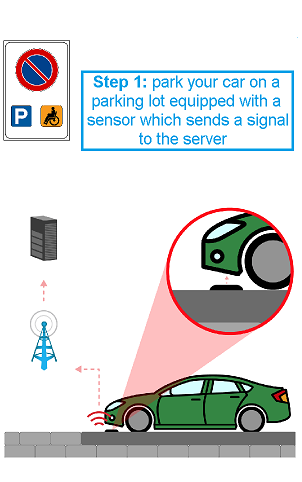
1) Several parking sensors:
These sensors must be placed in each parking lot, so keep in mind that the more an area is extended, the greater the need for a large number of these sensors.
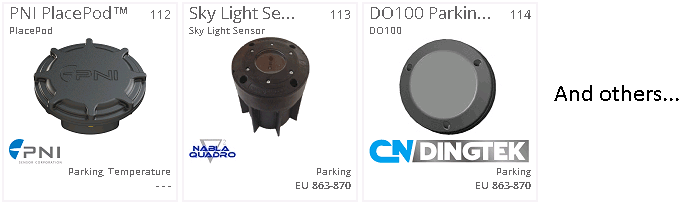
Any type of parking sensor will be fine to allow proper operation of the project, however it is recommended to use sensors of which we have a pre-set model, this to save time and effort.
2) Devices that support Android or IOS and that have an internet connection, on which to download the application related to this project.
Setting up the Project
This project is managed in 3 steps.
Each Step will explain a process that needs to be carried out to bring about a correct commissioning of the project.
It is highly recommended to follow the steps in the same order as they are shown below, otherwise unexpected conflicts can occur which can in turn lead to
unwanted problems.
In order the steps are as follows:
Step 1: Set the devices in ResIOT
Step 2: Set up scenes in ResIOT
Step 3: The App
Step 1: Set the devices in ResIOT
To set up the sensors, you must first log in to your ResIOT account, then select the "Node Group" option under the menu "Nodes/Devices".
Click on the "AddNew" button and in the two fields that appear, enter the word "ParkingSensors" and then save.
Now access the menu item that says "Nodes / Devices" and based on whether your sensor has a model in the ResIOT platform, do the following:
- Model available
If the model is available, at this point click on the "Add New" button, thus making a list appear with all the manufacturers and sensors available by us,
click on the sensor that corresponds to the one you own and proceed to create it.
- Model not available
If your sensor does not match any model then you have to proceed with manual configuration.
To do this, click on "Add Custom Node", this will take you to the standard node creation screen, where you have to start by entering all the standard data
(Name, Auth, DevEUI, etc.).
At this point it will be necessary to write the scene that will pave the message of entry of the node, and to do this you can find a guide
HERE.
When creating the node parsing script, remember one important thing, for the project to work correctly, the sensors must have a tag called "StatusInt" of
numeric type that must contain the value 0 if no car is present on the sensor, while 1 if there is.
Once the node is created, access it and go down the page to a small green screen, in which, on the last line, the latitude and longitude of the node will be displayed
with an edit button, click that button, enter the sensor coordinates and save.
Under that green screen you should find the field "Node Group", click it, select the group previously created "ParkingSensors" and save.
Then go back to the node and go down to the section "Node Fields", which should already be populated by several lines, the one you are interested in is
called "UserExtraValue02", once found, click on the button on the right "Edit Value" and in the new window that will appear enter the description of the
road where the sensor will be installed. (Please note that this field accepts a maximum of 256 characters)
With the sensors now ready, let's proceed to the creation of the scenes.
Step 2: Set up scenes in ResIOT
As mentioned previously, this project will use 3 scenes, or rather, 2 Lua 5.1 Scripts and 1 Smart Scene.
In order to create these scenes, you must log in to your ResIOT account and go to the "Smart Scene/Script Lua" page in the menu on the left.
- Scene 1: [PARKING][ADVANCED] SCAN AREA
This is the first scene to be implemented, and it is that scene that is called by the App to request sensor data.
Click on the "AddNew" button and between the two possibilities that are shown select "Script Lua 5.1 Scene".
While the name is indicative and you can decide to call it what you want, in the tag field you are obliged to put the value "ResIOTSmartParking",
in order to be identified by the App.
Code of the scene 1:
--returns true if there's an error in our api response and prints the error, otherwise returns false
function handleApiError(json)
  if json == "" then
    resiot_debug("empty data")
    return true
  end
  gg = json_getfield(json, "error")
  if gg ~= "" then
    resiot_debug(gg)
    return true
  end
  return false
end

function escapeJsonString(json)
  json = string.gsub(json, '\\', "\\\\")
  json = string.gsub(json, '\"', "\\\"")
  json = string.gsub(json, '\t', "\\t")
  json = string.gsub(json, '\r', "\\r")
  json = string.gsub(json, '\n', "\\n")
  json = string.gsub(json, '\f', "\\f")
  json = string.gsub(json, '\b', "\\b")
  return json
end

--return the coordinates read from the app if the scene has been triggered by the app, otherwise return two fictional coordinates if testing with the "play" button
function getCoords()
  Origin = resiot_startfrom()
  if Origin == "Manual" then
    inputJson = '{"lat":45.534060, "lon":10.011074}'
  else
    inputJson = resiot_comm_getparam("input")
  end
  latS = json_getfield(inputJson, "lat")
  lonS = json_getfield(inputJson, "lon")
  return tonumber(latS), tonumber(lonS)
end

--creating the final json and returning it as a string..
function giveMeJson(nodes)
  json = '{"data": ['
  c = 0
  for k, v in pairs(nodes) do
    if c > 0 then
        json = json .. ","
    end
    json = json .. '{"time":'..v['time']..', "state":"'..v['state']..'", "iduser":"'..v['iduser']..'", "via":"'..v['via']..'", "name":"'..escapeJsonString(v['name'])..'", "appeui":"'..v['appeui']..'", "deveui":"'..v['deveui']..'", "lat":'..v['lat']..', "lon":'..v['lon']..', "distance":'..v['distance']..'}'
    c = c + 1
  end
  json = json .. ']}'
  return json
end

--handles a single node from the 'get nodes' api, and retrieves its coordinates along with its parking address, status and additional data
function handleElement(json, i, myLat, myLong)
  gg = json_getfield(json, "result."..i)
  if gg ~= "" then
    name = json_getfield(gg, "name")
    appeui = json_getfield(gg, "appEUI")
    deveui = json_getfield(gg, "devEUI")
    group = json_getfield(gg, "group")
    lat = resiot_getnodevalue(appeui, deveui, "Latitude")
    lon = resiot_getnodevalue(appeui, deveui, "Longitude")
    state = resiot_getnodevalue(appeui, deveui, "StatusInt")
    time = resiot_getnodevalue(appeui, deveui, "UserExtraValue01")
    via = resiot_getnodevalue(appeui, deveui, "UserExtraValue02")
    iduser = resiot_getnodevalue(appeui, deveui, "UserExtraValue03")
    distance = resiot_distance(myLat, myLong, lat, lon)
    if time == "" then
      time = 0
    end
    return {via=via, group=group, state=state, iduser=iduser, appeui=appeui, deveui=deveui, lat=lat, lon=lon, distance=distance, name=name, time=time}
  end
  return false
end

--SCENE STARTS HERE--
resiot_sleep(1000)
json = resiot_getapicall('', '/api/application/nodes?nodeGroupName=ParkingSensors')
err = handleApiError(json)
if err == true then
  do return end
end
totalCount = json_getfield(json, "totalCount")
lathere, lonhere = getCoords()
nodes = {}
for ii = 0, math.ceil(tonumber(totalCount)/1000) - 1, 1 do
  resiot_sleep(1000)
  json = resiot_getapicall('', '/api/application/nodes?limit=1000&offset='..(ii * 1000)..'&nodeGroupName=ParkingSensors')
  err = handleApiError(json)
  if err == true then
    do return end -- error? We exit... if there was an error it should have been printed already
  end
  for i = 0, 999, 1 do
    gg = handleElement(json, i, lathere, lonhere)
    if gg ~= false then
      table.insert(nodes, gg)
    end
  end
end

--we sort all the nodes by their distance
table.sort(nodes, function (left, right)
    return left.distance < right.distance
end)

jsonString = giveMeJson(nodes)
resiot_setreturnvalue(jsonString) --we return this to the app!
- Scene 2: [PARKING][ADVANCED] PARKING STATUS CHANGED
The second scene starts when ResIOT warns that one of the parking sensors has sent a status change message,
and based on the different case studies, the scene performs several actions.
For this scene the tag field is not required, so you can ignore it.
Code of the scene 2:
SLEEP_SECONDS = 30
appeui = resiot_comm_getparam("appeui")
deveui = resiot_comm_getparam("deveui")
tag = resiot_comm_getparam("tag")
oldval = resiot_comm_getparam("oldval")
newval = resiot_comm_getparam("newval")
if tag == "StatusInt" then
  if newval=="1" then --someone parked over our sensor!
    v = ""
    for t = 0, SLEEP_SECONDS - 1, 1 do
      v = resiot_getnodevalue(appeui, deveui, "UserExtraValue03")
      if v ~= "" then
        resiot_setnodevalue(appeui, deveui, "UserExtraValue01", tostring(SLEEP_SECONDS))
        break
      end
      v = resiot_getnodevalue(appeui, deveui, tag)
      if v ~= "1" then --meanwhile... the parking was left
        resiot_setnodevalue(appeui, deveui, "UserExtraValue01", tostring(SLEEP_SECONDS))
        do return end
      end
      resiot_setnodevalue(appeui, deveui, "UserExtraValue01", tostring(SLEEP_SECONDS - t))
      resiot_sleep(1000)
    end
    if v == "" then
      --TODO: NOBODY CLAIMED THE PARKING -> TRIGGER YOUR ACTION HERE
    end
  else --someone is leaving the parking!
    resiot_setnodevalue(appeui, deveui, "UserExtraValue03", "")
    resiot_setnodevalue(appeui, deveui, "UserExtraValue01", tostring(SLEEP_SECONDS))
  end
end
- Scene 3: [PARKING][SMART] ON TAG CHANGE -> RUN SCENE
The third scene, that is the only "Smart", is the one that plans the start of scene 2 when it realizes that a sensor has sent a status change message.
Click on "AddNew" and select the "Smart Scene" option, in the new page that will appear enter the name you prefer.
Now click once on the "Add New Condition" button of the "IF CONDITION" section, you will create a new line, where you have to click on the field
just appeared and select the word "All Nodes", done this will appear another field to its right, in this case you have to select "On Change Value Tag".
Once that is done, click once on the "Add New Action" button in the "ACTIONS" section, again displaying a new line, where in the new field you will now
have to select the name that was given to scene 2, and once done another field will appear to his right where you have to select the writing "Scene Start",
and then save the scene.
Step 3: The App
The App is the key element of this project and is the only tool that end users will use.
The app is called "ResIOT Smart Parking", and can be found either on the Android store
(Download Link), or on the IOS store
(Download Link)
or you can directly download the project for Phonegap
(Download Link).
The first time the App will be launched you will be asked to accept that the App can access the smartphone's GPS, accepted, in case of refusal the
app can not be used and then you will have to uninstall and reinstall it.
Once you have accepted the permissions, you will end up on the first page containing a button labeled "Link to an existing Server", click on it and
it will take you to the server connection page.
In this new page you will enter the credentials to access your server, below you will find a small list that will explain the individual fields:
- Description: In this field you will enter the name with which you want to recognize this configuration;
- Host/IP: In this field you need to write the address of the server you need to connect to (example. "www.site.com" or "75.258.142.26");
- Username: In this field you must enter the login that is used to access the ResIOT platform;
- Password: As you can guess, this is the password of your ResIOT account;
- SSL: This field is used to understand if the server works in http or https;
- Port: This is the port in which your server accesses, if SSL is active, it will probably be 443;
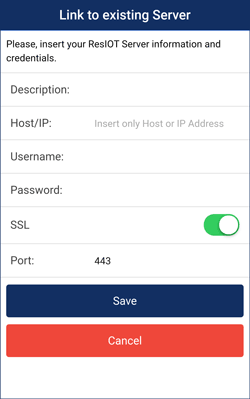
Click now on "Save" to save the configuration entered.
Once you do this you will be shown on the first page, but this time populated by an element that represents the server just connected,
click it and you will access it.
Once loaded the new page you should find yourself with the list of devices that you have connected on the platform in order from the closest to the farthest.
To the left of each row will be a square with a color that indicates a state of the sensor.
Below is a list of possible states:
- Green: The sensor indicates that the parking lot is free and therefore available;
- Orange: Parking lot is used, but no one has yet declared possession of it;
- Red: Parking lot is used and someone has already recognized its possession;
- Blue: Your parking lot;
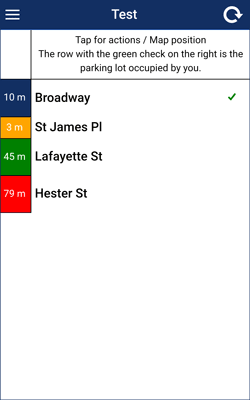
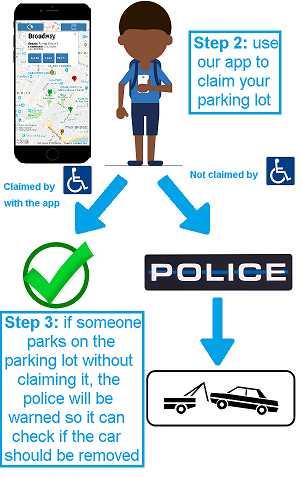
In the event that the parking lot is in "Orange" status a button will appear on the right of the line containing the word "Occupy", indicating that that parking lot
must be recognized by someone.
If that car park is yours then click inside, this will send out a confirmation message that will ask if you are sure, and accepting will begin the process of
occupation that consists in checking if the parking has not yet been recognized by anyone, and later in the actual parking recognition as yours.
At the end of the operation the screen will be updated and if everything has been successful, the sensor that you had selected has become blue and has moved to
the first position.
When the car leaves the parking lot, the status of the sensor on which it was parked will automatically become green, ready immediately for the next vehicle.
If there are more orange parking lots but you already own a parking space, then they will not show the occupancy button.
Conclusion
Once all the steps have been completed, you now have a fully functional parking app.
If during the course of work you want to add further sensors inside the App, what you have to do is repeat Step 1,
after which the App will automatically recognize these new sensors.