Node Detail Box
What is a Node Detail Box
The Node Detail Box is a box that shows various type of informations, such as Tag values or Widgets, and Command buttons to interact with. The content of the Node Detail Box is completely customizable because it uses Lua 5.1 Scenes in which you can choose what is the content of the Node Detail Box.
How to access the Node Detail Box
You can access the Node Detail Box from the side menu Nodes/Devices->Nodes/Devices. Here you can see the list of your Nodes, near each Node there's this icon  . When you click on it the Node Detail Box opens. You can also access it by clicking on a Node and then clicking on top on Node Detail Box.

How to create and customize a Node Detail Box
From the side menu go to Nodes/Devices->Nodes/Devices, then click on the Node in which you want to create the Node Detail Box. When the Node page opens click on the section called Node Detail Box. 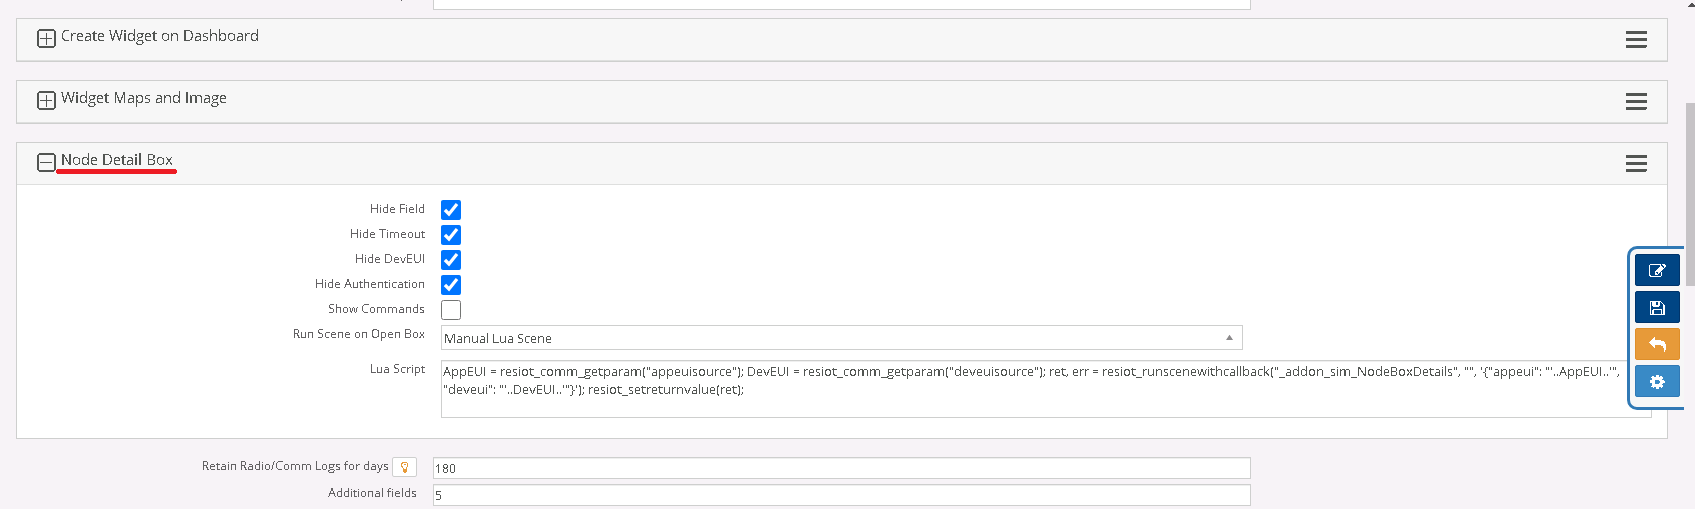 The section expands and shows various options that allow you to show or hide some preconfigured informations. Now look at the "Run Scene on Open Box" option, click on the dropdown menu, it is highly recommended to choose "Manual Lua Scene". Now a text box appears, here we're going to write a short Lua Scene that takes the main data of the node and sends it to the final Node Detail Box Scene. Here's an example (referer to "Script Lua 5.1 Functions" documentation if you want to learn more about the Lua functions used here):
AppEUI = resiot_comm_getparam("appeuisource");
DevEUI = resiot_comm_getparam("deveuisource");
ret, err = resiot_runscenewithcallback("NodeBoxDetailsScene", "", '{"appeui": "'..AppEUI..'", "deveui": "'..DevEUI..'"}');
resiot_setreturnvalue(ret);
Now we're going to create a new Lua Scene that handles the call made from the previous Scene. This Scene will use the data provided and will contain the contents to show in the Node Detail Box. If you have never created a Lua Scene before, here's the tutorial: Script Lua 5.1 Scenes. In this example I'm going to create a Scene called "NodeBoxDetailsScene" because it's the name of the Scene to call that we chose before in function resiot_runscenewithcallback. You can choose any name you want, the only important thing is that the name of the Scene must be the same you call in resiot_runscenewithcallback. Here's an example of the code of the final Scene:
Input = resiot_comm_getparam("input")           -- The Data we sent to this Scene
AppEUI, err = json_getfield(Input, "appeui")
DevEUI, err = json_getfield(Input, "deveui")

Status=resiot_getnodevalue(AppEUI,DevEUI,"Status")

ReturnHtml = ""                                 -- Here it is initialized the variable that will contain HTML code that will be shown in the Node Detail Box
-- EXAMPLES OF CONTENTS
ReturnHtml = ReturnHtml..resiot_gethtml_nodecommand(AppEUI, DevEUI, "Command Name 1")   -- This function gets the HTML code of a Command button and it is appended to the ReturnHtml variable
ReturnHtml = ReturnHtml.."<br>Status: "..Status     -- Value of a Node Tag
-- Widget based on a Node Tag
DataUsage=resiot_getnodevalue(AppEUI,DevEUI,"DataUsage")
if tonumber(DataUsage) ~= 0 then
  ReturnHtml = ReturnHtml..[[<div>]]..resiot_gethtml_widget("datausage", 10, AppEUI, DevEUI, "DataUsage", true, "", "150", "Data Usage (MBytes)", "#8B0000", 1, 0, 0)..[[</div>]]
else
 ReturnHtml = ReturnHtml..[[<div><i class="fa fa-bar-chart"></i> <i>Unavailable Graph</i></div>]]
end

-- Other instructions you can add in your HTML code
ReturnHtml = ReturnHtml..[[
    <script>
        // You can add JavaScript and JQuery instructions to be executed
    </script>
    <style>
        /* You can add CSS instructions */
    </style>]]

resiot_setreturnvalue(ReturnHtml)   -- This functions returns your HTML code to the first scene, which will use it to create your Node Detail Box